Hey everyone, welcome to my recipe page, if you're looking for Stronger Bread Starter By Increasing the Yeast Content recipe, look no further! We provide you only the best Stronger Bread Starter By Increasing the Yeast Content recipe here. We also have wide variety of recipes to try.
Before you jump to Stronger Bread Starter By Increasing the Yeast Content recipe, you may want to read this short interesting healthy tips about Methods To Live Green And also Conserve Money In The Kitchen.
Until fairly recently anyone who expressed concern about the destruction of the environment raised skeptical eyebrows. That’s a thing of the past now, with everybody being aware of the problems besetting the planet as well as the shared burden we have for turning things around. According to the industry experts, to clean up the surroundings we are all going to have to make some improvements. These kinds of modifications need to start occurring, and each individual family needs to become more environmentally friendly. Here are a few tips that can help you save energy, primarily by making your kitchen more green.
Changing light bulbs is as good a spot get started on as any. Accomplish this for your house, not merely the kitchen. The normal light bulbs are the incandescent style, which should be replaced with compact fluorescent lightbulbs, which save energy. Although costing a little more in the beginning, these bulbs last as long as ten of the traditional type as well as using a lot less energy. One of the extras is that for every one of these lightbulbs used, it signifies that approximately ten normal lightbulbs less will probably end up at a landfill site. Together with different light bulbs, you need to learn to leave the lights off when they are not needed. The family spends considerable time in the cooking area, and how typically does the kitchen light go on in the morning and is left on all day long. And it’s not confined to the kitchen, it takes place in other parts of the house at the same time. Do an exercise if you like; have a look at the quantity of electricity you can save by turning the lights off whenever you don’t need them.
As you can see, there are many little things that you can do to save energy, as well as save money, in the kitchen alone. Green living is something we can all do, without difficulty. It’s about being sensible, usually.
We hope you got benefit from reading it, now let’s go back to stronger bread starter by increasing the yeast content recipe. To make stronger bread starter by increasing the yeast content you need 10 ingredients and 26 steps. Here is how you cook it.
The ingredients needed to cook Stronger Bread Starter By Increasing the Yeast Content:
- Take 110 grams Raisins (not coated with oil or wax)
- Provide 210 grams Water (domestic natural spring water) or boiled and cooled water
- Prepare 40 grams Sugar
- Take 1 A plastic or glass jar without a lid
- Get 1 piece Paper towels and a rubber band or aluminium foil
- Get To extend a previously made starter
- You need 100 grams Raisins (not coated with oil or wax)
- Prepare 200 grams Water
- Use 40 grams Sugar
- Prepare 10 grams Raisin starter
Instructions to make Stronger Bread Starter By Increasing the Yeast Content:
- If the starter is exposed to air, it'll deplete the sugars and build up carbon dioxide. If it's not exposed to air, it'll start fermenting and produce alcohol.
- If you want to let the yeast grow, it needs air to grow, thus don't cover your starter with a lid! That's the logic behind the instructions.
- If you want to make a strong and active raisin starter, use a wide-mouth container so that comes into plenty of contact with air. Don't cover it with a lid, cover with paper towels or foil instead, and increase the number of times you mix it up. That alone makes all the difference.
- Don't wash the raisins. If you are using tap water, filter it or use boiled and cooled water. If you use straight tap water, the starter may become acidic, so use soft water like spring water.
- Don't wipe your starter container with a kitchen towel before use. If it has water droplets after washing it, it's fine. Sterilize the spoon mix the starter in boiling water.
- Wash all of your equipment well using detergent, but don't wipe with a kitchen towel as the towels may have bacteria on it.
- Here I made two batches of starter at once to demonstrate the theory, but just make the lidless version.
- How to make the starter: Put the sugar and water that has been warmed up to about 30°C in the container and dissolve the sugar. Add the raisins.
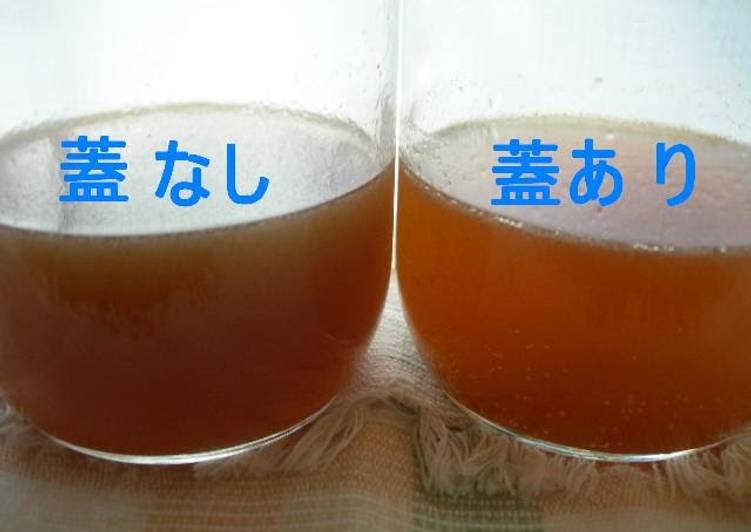
- Start the experiment! As you can see, the one on the left is covered with a lid. The one on the right has no lid. Both have the same amount of ingredients.
- If doing this at room temperature: Put the starter jars in a warm place, and mix them up twice a day. The ideal room temperature is 26 to 30°C.
- Day 2: The raisins are rising to the surface. You can see some fine bubbles in the lidded one. In the lidless one you can see big bubbles.
- Day 4: The lid-covered one has lots of bubles! The lidless one has about the same amount of bubbles. The liquid in the lidless one is a bit darker.
- Day 5: The raisins are floating above the surface of the lid-covered on, and the liquid is foaming. If you mix it up, the foam increases and the liquid gets more cloudy.
- The lidless one has a sweet-tart aroma and no detectable alcohol smell.
- If you mix it up and look at it from the side, it has some fine bubbles. Strain off the raisins from both versions, and store in the refrigerator.
- The left one is the lidless version, and the right one is the lidded version. The lidded version has a lighter, prettier color, and foams up like beer. The lidless version is cloudier and darker!! And when you mix it up, it stays quiet. It also tastes stronger, and has way more yeast!! Both are done.
- Store them both covered. While they are stored in the refrigerator, open them up at least twice a month to expose it to air. Use within a month.
- When there is only a little starter left, using the "extend" amounts to keep them going. You can keep them alive for years. Add 1 teaspoon of sugar once a month and store.
- How to make the starter extension: The temperature to aim for for the raisin starter is 25 to 30°C.
- Use your existing starter liquid as the mother. Put 30°C water in a clean container, add sugar and dissolve, then add the raisins and the mother starter. Cover with paper towels.
- Put the container in a warm location. Observe its progress, using the photos on this page as reference.
- You can use the raisins used to make starter mixed into dough to make bread.
- If you use raisins to make starter, you shouldn't get mold. Raisins contain a powerful anti-fungal agent called propionic acid.
- Raisin bread does not mold easily. If mold does occur, there are probably other reasons.
- If something called acetic acid bacteria develops, a white film will develop on the surface of the liquid, and it will smell bad.
- If that happens, just throw the starter out and try again If you introduce as much oxygen as possible, you can avoid this.
If you're buying dry yeast, you usually don't need to make a yeast starter because. As the wild yeast grows stronger, the starter will become more frothy and sour-smelling. At this point, the starter should smell fresh, mildly sweet, and yeasty. By now, the starter should be looking very bubbly with large and small bubbles, and it will have doubled in volume. Some start with rye or whole wheat flour, thinking there is more yeast potential on the surface of the whole grains, but I've always had success with all-purpose flour, which is ideal for starting white After a few days it should start to bubble and even look foamy, and smell clean and yeasty, even vinegary.
If you find this Stronger Bread Starter By Increasing the Yeast Content recipe helpful please share it to your friends or family, thank you and good luck.